Rose Suite Configurations
Rose application configurations can be used to encapsulate the environment and resources required by a Cylc task.
Similarly Rose suite configurations can be used to do the same for a Cylc suite.
Configuration Format
A Rose suite configuration is a Cylc suite directory containing a
rose-suite.conf file.
The rose-suite.conf file is written in the same
format as the
rose-app.conf file. Its main configuration sections are:
rose-suite.conf[env]- Environment variables for use by the whole suite.
rose-suite.conf[jinja2:suite.rc]- Jinja2 variables for use in the
suite.rcfile. rose-suite.conf[empy:suite.rc]- EmPy variables for use in the
suite.rcfile. rose-suite.conf[file:NAME]- Files and resources to be installed in the run directory when the suite is run.
In the following example the environment variable GREETING and the
Jinja2 variable WORLD are both set in the rose-suite.conf
file. These variables can then be used in the suite.rc file:
[env]
GREETING=Hello

[jinja2:suite.rc]
WORLD=Earth
[scheduling]
    [[dependencies]]
        graph = hello_{{WORLD}}

[runtime]
    [[hello_{{WORLD}}]]
        script = echo "$GREETING {{WORLD}}"
Suite Directory Vs Run Directory
- suite directory
- The directory in which the suite is written. The
suite.rcandrose-suite.conffiles live here. - run directory
- The directory in which the suite runs. The
work,shareandlogdirectories live here.
Throughout the Cylc Tutorial we wrote suites in the cylc-run
directory. As Cylc runs suites in the cylc-run directory the
suite directory is also the run directory i.e. the suite runs
in the same directory in which it is written.
With Rose we develop suites in a separate directory to the one in which they run meaning that the suite directory is different from the run directory. This helps keep the suite separate from its output and means that you can safely work on a suite and its resources whilst it is running.
Note
Using Cylc it is possible to separate the suite directory and
run directory using the cylc register command. Note though
that suite resources, e.g. scripts in the bin/ directory, will remain
in the suite directory so cannot safely be edited whilst the suite
is running.
Running Rose Suite Configurations
Rose Application Configurations are run using rose app-run, Rose Suite Configurations are run using rose suite-run.
When a suite configuration is run:
- The suite directory is copied into the
cylc-rundirectory where it becomes the run directory. - Any files defined in the
rose-suite.conffile are installed. - Jinja2 variables defined in the
rose-suite.conffile are added to the top of thesuite.rcfile. - The Cylc suite is validated.
- The Cylc suite is run.
- The Cylc GUI is launched.
Like rose app-run, rose suite-run will look
for a configuration to run in the current directory. The command can be run
from other locations using the -C argument:
rose suite-run -C /path/to/suite/configuration/
The --local-install-only command line option will cause the suite
to be installed (though only on your local machine, not on any job hosts) and
validated but not run (i.e. steps 1-4).
Start, Stop, Restart
Under Rose, suites will run using the name of the suite directory. For
instance if you run rose suite-run on a suite in the directory
~/foo/bar then it will run with the name bar.
The name can be overridden using the --name option i.e:
rose suite-run --name <SUITE_NAME>
- Running/Interacting With Suites
- Suites must be run using the rose suite-run command which
in turn calls the
cylc runcommand. - Stopping Suites
- Suites can be stopped using the
cylc stop <SUITE_NAME>command, as for regular Cylc suites. - Restarting Suites (From Stopped)
There are two options for restarting:
- To pick up where the suite left off use rose suite-restart. No changes will be made to the run directory. This is usually the recommended option.
- To restart in a way that picks up changes made in the suite directory,
use the
--restartoption to the rose suite-run command.
See the Cheat Sheet for more information.
Note
rose suite-run installs suites to the run directory
incrementally so if you change a file and restart the suite using
rose suite-run --restart only the changed file will be re-installed.
This process is strictly constructive i.e. any files deleted in the suite
directory will not be removed from the run directory. To force
rose suite-run to perform a complete rebuild, use the
--new option.
Practical
In this tutorial we will create a Rose Suite Configuration for the weather-forecasting suite.
Create A New Suite.
Create a copy of the weather-forecasting suite by running:
rose tutorial rose-suite-tutorial ~/rose-tutorial/rose-suite-tutorial
cd ~/rose-tutorial/rose-suite-tutorial
Set the initial and final cycle points as in previous tutorials.
Create A Rose Suite Configuration.
Create a blank
rose-suite.conffile:touch rose-suite.conf
You now have a Rose suite configuration. A
rose-suite.conffile does not need to have anything in it but it is required to run rose suite-run.There are three things defined in the
suite.rcfile which it might be useful to be able to configure:stationThe list of weather stations to gather observations from.
RESOLUTIONThe spatial resolution of the forecast model.
DOMAINThe geographical limits of the model.
Define these settings in the
rose-suite.conffile by adding the following lines:[jinja2:suite.rc] station="camborne", "heathrow", "shetland", "aldergrove" [env] RESOLUTION=0.2 DOMAIN=-12,48,5,61
Note that Jinja2 strings must be quoted.
Write Suite Metadata.
Create a
meta/rose-meta.conffile and write some metadata for the settings defined in therose-suite.conffile.stationis a list of unlimited length.RESOLUTIONis a “real” number.DOMAINis a list of four integers.
Tip
For the
RESOLUTIONandDOMAINsettings you can copy the metadata you wrote in the Metadata Tutorial.Solution
[jinja2:suite.rc=station]
length=:

[env=RESOLUTION]
type=real

[env=DOMAIN]
length=4
type=integer
Validate the metadata:
rose metadata-check -C meta/
Open the rose config-edit GUI. You should see suite conf in the panel on the left-hand side of the window. This will contain the environment and Jinja2 variables we have just defined.
Use Suite Variables In The
suite.rcFile.Next we need to make use of these settings in the
suite.rcfile.We can delete the
RESOLUTIONandDOMAINsettings in the[runtime][root][environment]section which would otherwise override the variables we have just defined in therose-suite.conffile, like so:[runtime] [[root]] # These environment variables will be available to all tasks. [[[environment]]] # Add the `python` directory to the PYTHONPATH. PYTHONPATH="$CYLC_SUITE_RUN_DIR/lib/python:$PYTHONPATH" - # The dimensions of each grid cell in degrees. - RESOLUTION = 0.2 - # The area to generate forecasts for (lng1, lat1, lng2, lat2). - DOMAIN = -12,48,5,61 # Do not change!We can write out the list of stations, using the Jinja2
joinfilter to write the commas between the list items:[cylc] UTC mode = True [[parameters]] # A list of the weather stations we will be fetching observations from. - station = camborne, heathrow, shetland, aldergrove + station = {{ station | join(", ") }} # A list of the sites we will be generating forecasts for. site = exeterInstall The Suite.
Running rose suite-run will cause the suite to be installed, validated and run.
Use the
--local-install-onlycommand-line option to install the suite on your local machine and validate it:rose suite-run --local-install-only
Inspect the installed suite, which you will find in the run directory, i.e:
~/cylc-run/rose-suite-tutorial
You should find all the files contained in the suite directory as well as the run directory folders
log,workandshare.
Rose Applications In Rose Suite Configurations
In Cylc suites, Rose applications are placed in an app/ directory which
is copied across to the run directory with the rest of the suite by
rose suite-run when the suite configuration is run.
When we run Rose applications from within Cylc suites we use the rose task-run command rather than the rose app-run command.
When run, rose task-run searches for an application with the
same name as the Cylc task in the app/ directory.
The rose task-run command also interfaces with Cylc to provide a few useful environment variables (see the command-line reference for details). The application will run in the work directory, just like for a regular Cylc task.
In this example the hello task will run the application located in
app/hello/:
[runtime]
    [[hello]]
        script = rose task-run
[command]
default=echo "Hello World!"
The name of the application to run can be overridden using the --app-key
command-line option or the ROSE_TASK_APP environment variable. For
example the greetings task will run the hello
app in the task defined below.
[runtime]
    [[greetings]]
        script = rose task-run --app-key hello
Rose Bush
Rose provides a utility for viewing the status and logs of Cylc suites called Rose Bush. Rose Bush displays suite information in web pages.
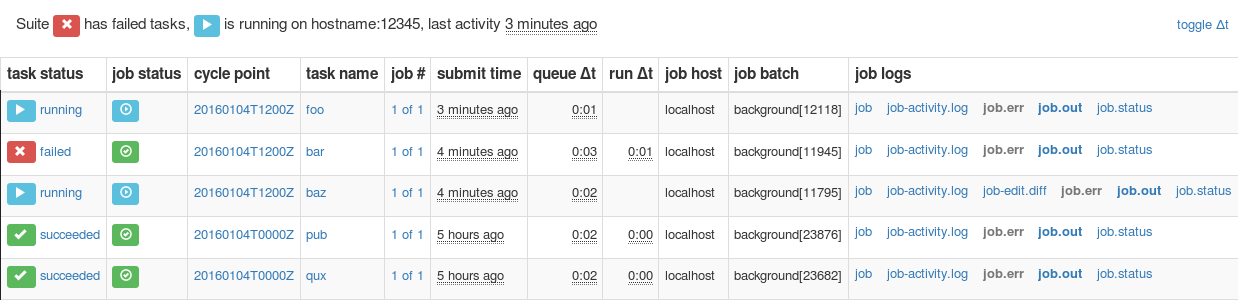
Screenshot of a Rose Bush web page.
If a Rose Bush server is provided at your site, you can open the Rose Bush page for a suite by running the rose suite-log command in the suite directory.
Otherwise an add-hoc web server can be set up using the
rose bush start command argument.
Practical
In this practical we will take the forecast Rose application
that we developed in the Metadata Tutorial
and integrate it into the weather-forecasting suite.
Move into the suite directory from the previous practical:
cd ~/rose-tutorial/rose-suite-tutorial
You will find a copy of the forecast application located in
app/forecast.
Create A Test Configuration For The
forecastApplication.We have configured the
forecastapplication to use test data. We will now adjust this configuration to make it work with real data generated by the Cylc suite. It is useful to keep the ability to run the application using test data, so we won’t delete this configuration. Instead we will move it into an Optional Configuration so that we can run the application in “test mode” or “live mode”.Optional configurations are covered in more detail in the Optional Configurations Tutorial. For now all we need to know is that they enable us to store alternative configurations.
Create an optional configuration called
testinside theforecastapplication:mkdir app/forecast/opt touch app/forecast/opt/rose-app-test.conf
This optional configuration is a regular Rose configuration file. Its settings will override those in the
rose-app.conffile if requested.Tip
Take care not to confuse the
rose-app.confandrose-app-test.conffiles used within this practical.Move the following environment variables from the
app/forecast/rose-app.conffile into an[env]section in theapp/forecast/opt/rose-app-test.conffile:WEIGHTINGWIND_CYCLESWIND_FILE_TEMPLATERAINFALL_FILEMAP_FILECYLC_TASK_CYCLE_POINTRESOLUTIONDOMAIN
Solution
The
rose-app-test.conffile should look like this:[env] WEIGHTING=1 WIND_CYCLES=0 WIND_FILE_TEMPLATE=test-data/wind_{cycle}_{xy}.csv RAINFALL_FILE=test-data/rainfall.csv MAP_FILE=map.html CYLC_TASK_CYCLE_POINT=20171101T0000Z RESOLUTION=0.2 DOMAIN=-12,48,5,61
Run the application in “test mode” by providing the option
--opt-conf-key=testto the rose app-run command:mkdir app/forecast/run cd app/forecast/run rose app-run --opt-conf-key=test -C ../ cd ../../../
You should see the stdout output of the Rose application. If there are any errors they will be marked with the
[FAIL]prefix.Integrate The
forecastApplication Into The Suite.We can now configure the
forecastapplication to work with real data.We have moved the map template file (
map-template.html) into theforecastapplication so we can delete theMAP_TEMPLATEenvironment variable from the[runtime]forecastsection of thesuite.rcfile.Copy the remaining environment variables defined in the
forecasttask within thesuite.rcfile into therose-app.conffile of theforecastapplication, replacing any values already specified if necessary. Remove the lines from thesuite.rcfile when you are done.Remember, in Rose configuration files:
- Spaces are not used around the equals (
=) operator. - Ensure the environment variables are not quoted.
The
[env]section of yourrose-app.conffile should now look like this:[env] INTERVAL=60 N_FORECASTS=5 WEIGHTING=1 MAP_TEMPLATE=map-template.html SPLINE_LEVEL=0 WIND_FILE_TEMPLATE=$CYLC_SUITE_WORK_DIR/{cycle}/consolidate_observations/wind_{xy}.csv WIND_CYCLES=0, -3, -6 RAINFALL_FILE=$CYLC_SUITE_WORK_DIR/$CYLC_TASK_CYCLE_POINT/get_rainfall/rainfall.csv MAP_FILE=${CYLC_TASK_LOG_ROOT}-map.html
Finally we need to change the
forecasttask to run rose task-run. The[runtime]forecastsection of thesuite.rcfile should now look like this:[[forecast]] script = rose task-run
- Spaces are not used around the equals (
Make Changes To The Configuration.
Open the rose config-edit GUI and navigate to the suite conf > env panel.
Change the
RESOLUTIONvariable to0.1Navigate to the forecast > env panel.
Edit the
WEIGHTINGvariable so that it is equal to the following list of values:0.7, 0.2, 0.1
Tip
Click the “Add array element” button (+) to extend the number of elements assigned to
WEIGHTING.Finally, save these settings via File > Save in the menu.
Run The Suite.
Install, validate and run the suite:
rose suite-run
The
cylc guishould open and the suite should run and complete.View Output In Rose Bush.
Open the Rose Bush page in a browser by running the following command from within the suite directory:
rose suite-log
On this page you will see the tasks run by the suite, ordered from most to least recent. Near the top you should see an entry for the
forecasttask. On the right-hand side of the screen click job-map.html.As this file has a
.htmlextension Rose Bush will render it. The raw text would be displayed otherwise.