Introduction
So far we have been working with the [scheduling] section. This is where
the workflow is defined in terms of tasks and
dependencies.
In order to make the workflow runnable we must associate tasks with scripts
or binaries to be executed when the task runs. This means working with the
[runtime] section which determines what runs, as well as where and how
it runs.
The Task Section
The runtime settings for each task are stored in a sub-section of the
[runtime] section. E.g. for a task called hello_world we would write
settings inside the following section:
[runtime]
    [[hello_world]]
The script Setting
We tell Cylc what to execute when a task is run using the script
setting.
This setting is interpreted as a bash script. The following example defines a
task called hello_world which writes Hello World! to stdout upon
execution.
[runtime]
    [[hello_world]]
        script = echo 'Hello World!'
Note
If you do not set the script for a task then nothing will be run.
We can also call other scripts or executables in this way, e.g:
[runtime]
    [[hello_world]]
        script = ~/foo/bar/baz/hello_world
It is often a good idea to keep our scripts within the Cylc suite directory
tree rather than leaving them somewhere else on the system. If you create a
bin sub-directory within the suite directory this directory will
be added to the path when tasks run, e.g:
#!/usr/bin/bash
echo 'Hello World!'
[runtime]
    [[hello_world]]
        script = hello_world
Tasks And Jobs
When a task is “Run” it creates a job. The job is a bash file containing the script you have told the task to run along with configuration specifications and a system for trapping errors. It is the job which actually gets executed and not the task itself. This “job file” is called the job script.
During its life a typical task goes through the following states:
- Waiting
- Tasks wait for their dependencies to be satisfied before running. In the meantime they are in the “Waiting” state.
- Submitted
- When a task’s dependencies have been met it is ready for submission. During this phase the job script is created. The job is then submitted to the specified batch system. There is more about this in the next section.
- Running
- A task is in the “Running” state as soon as the job is executed.
- Succeeded
- If the job submitted by a task has successfully completed (i.e. there is zero return code) then it is said to have succeeded.
These descriptions, and a few more (e.g. failed), are called the task states.
The Cylc GUI
To help you to keep track of a running suite Cylc has a graphical user interface (the Cylc GUI) which can be used for monitoring and interaction.
The Cylc GUI looks quite like cylc graph but the tasks are colour-coded
to represent their state, as in the following diagram.
This is the “graph view”. The Cylc GUI has two other views called “tree” and “dot”.
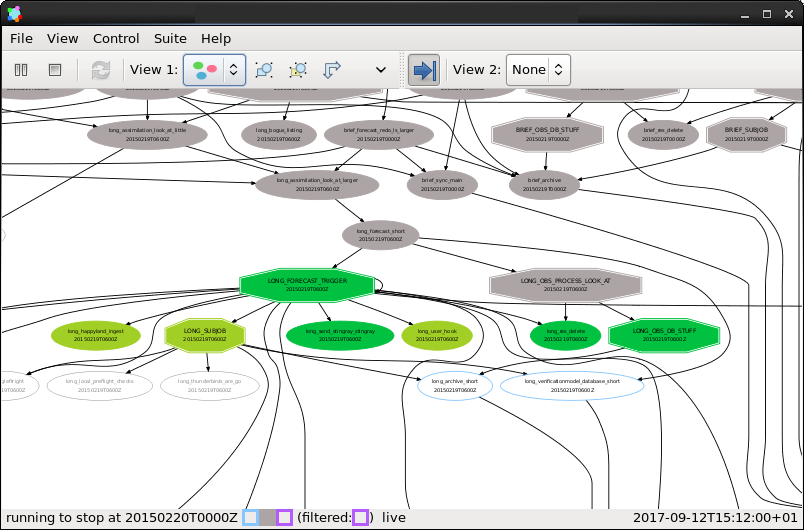
Screenshot of the Cylc GUI in “Graph View” mode.
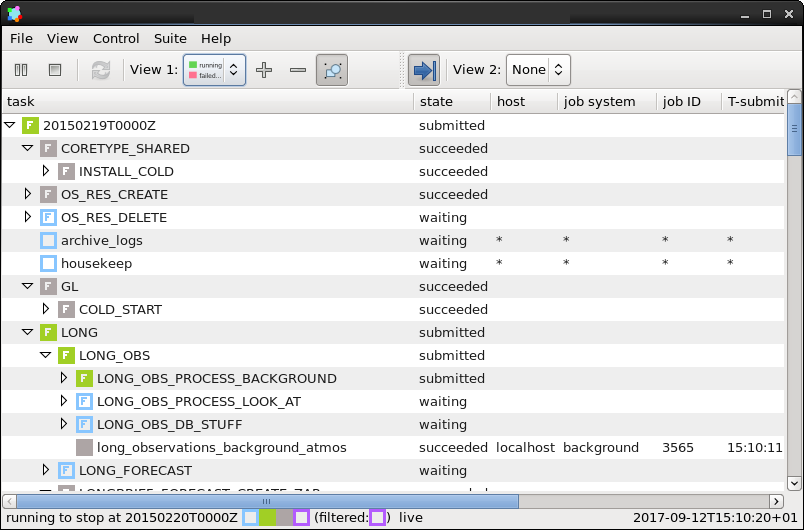
Screenshot of the Cylc GUI in “Tree View” mode.
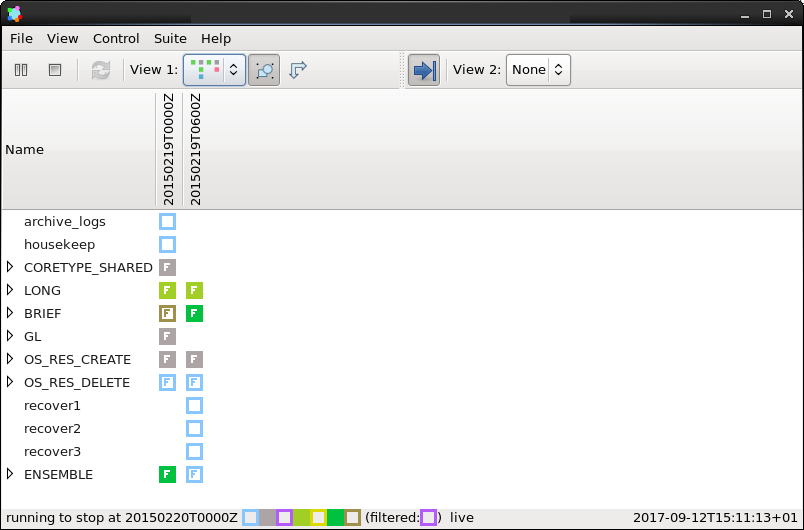
Screenshot of the Cylc GUI in “Dot View” mode.
Where Do All The Files Go?
The Work Directory
When a task is run Cylc creates a directory for the job to run in. This is called the work directory.
By default the work directory is located in a directory structure under the relevant cycle point and task name:
~/cylc-run/<suite-name>/work/<cycle-point>/<task-name>
The Job Log Directory
When a task is run Cylc generates a job script which is stored in the
job log directory as the file job.
When the job script is executed the stdout and stderr are redirected
into the job.out and job.err files which are also stored in the
job log directory.
The job log directory lives in a directory structure under the cycle point, task name and job submission number:
~/cylc-run/<suite-name>/log/job/<cycle-point>/<task-name>/<job-submission-num>/
The job submission number starts at 1 and increments by 1 each time a task is re-run.
Tip
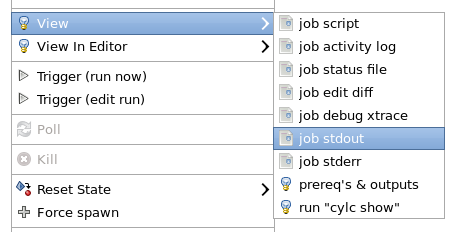
If a task has run and is still visible in the Cylc GUI you can view its job log files by right-clicking on the task and selecting “View”.
Running A Suite
It is a good idea to check a suite for errors before running it.
Cylc provides a command which automatically checks for any obvious
configuration issues called cylc validate, run via:
cylc validate <path/to/suite>
Here <path/to/suite> is the path to the suite’s location within the
filesystem (so if we create a suite in ~/cylc-run/foo we would put
~/cylc-run/foo/suite.rc).
Next we can run the suite using the cylc run command.
cylc run <name>
The name is the name of the suite directory (i.e. <name>
would be foo in the above example).
Note
In this tutorial we are writing our suites in the cylc-run directory.
It is possible to write them elsewhere on the system. If we do so we must register the suite with Cylc before use.
We do this using the cylc reg command which we supply with a name which
will be used to refer to the suite in place of the path i.e:
cylc reg <name> <path/to/suite>
cylc validate <name>
cylc run <name>
The cylc reg command will create a directory for the suite in the
cylc-run directory meaning that we will have separate
suite directories and
run directories.
Suite Files
Cylc generates files and directories when it runs a suite, namely:
log/Directory containing log files, including:
log/db- The database which Cylc uses to record the state of the suite;
log/job- The directory where the job log files live;
log/suite- The directory where the suite log files live. These files are written by Cylc as the suite is run and are useful for debugging purposes in the event of error.
suite.rc.processed- A copy of the
suite.rcfile made after any Jinja2 has been processed - we will cover this in the Consolidating Configuration section. share/- The share directory is a place where tasks can write files which are intended to be shared within that cycle.
work/- A directory hierarchy containing task’s work directories.
Practical
In this practical we will add some scripts to, and run, the weather forecasting suite from the scheduling tutorial.
Create A New Suite.
The following command will copy some files for us to work with into a new suite called
runtime-introduction:rose tutorial runtime-introduction cd ~/cylc-run/runtime-introductionIn this directory we have the
suite.rcfile from the weather forecasting suite with some runtime configuration added to it.There is also a script called
get-observationslocated in the bin directory.Take a look at the
[runtime]section in thesuite.rcfile.Run The Suite.
First validate the suite by running:
cylc validate .
Open the Cylc GUI (in the background) by running the following command:
cylc gui runtime-introduction &Finally run the suite by executing:
cylc run runtime-introduction
The tasks will start to run - you should see them going through the “Waiting”, “Running” and “Succeeded” states.
When the suite reaches the final cycle point and all tasks have succeeded it will shutdown automatically and the GUI will go blank.
Tip
You can also run a suite from the Cylc GUI by pressing the “play” button.

A box will appear. Ensure that “Cold Start” is selected then press “Start”.
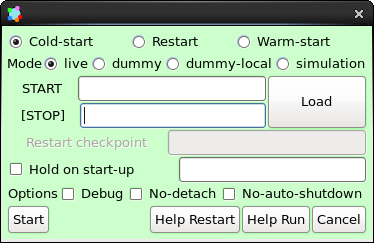
Inspect A Job Log.
Try opening the file
job.outfor one of theget_observationsjobs in a text editor. The file will be located within the job log directory:log/job/<cycle-point>/get_observations_heathrow/01/job.outYou should see something like this:
Suite    : runtime-introduction
Task Job : 20000101T0000Z/get_observations_heathrow/01 (try 1)
User@Host: username@hostname

Guessing Weather Conditions
Writing Out Wind Data
1970-01-01T00:00:00Z NORMAL - started
2038-01-19T03:14:08Z NORMAL - succeeded
- The first three lines are information which Cylc has written to the file to provide information about the job.
- The last two lines were also written by cylc. They provide timestamps marking the stages in the job’s life.
- The lines in the middle are the stdout of the job itself.
Inspect A Work Directory.
The
get_rainfalltask should create a file calledrainfallin its work directory. Try opening this file, recalling that the format of the relevant path from within the work directory will be:work/<cycle-point>/get_rainfall/rainfallHint
The
get_rainfalltask only runs every third cycle.Extension: Explore The Cylc GUI
Try re-running the suite.
Try changing the current view(s).
Try pressing the “Pause” button which is found in the top left-hand corner of the GUI.
Try right-clicking on a task. From the right-click menu you could try:
- “Trigger (run now)”
- “Reset State”
