Rose User Guide: Rose Config Edit
How to Run Rose Config Edit
In a suite or application directory, run:
rose config-edit
or point the config editor to a directory using -C:
rose config-edit -C ~/my_suites/this_suite
How to Configure an Application Using Rose Config Edit
Launch a Page
A page is a collection of settings on a single panel. Unless overridden in the metadata, each page represents a section in the configuration.
Use the left hand panel to explore the tree of pages. Left click the triangles to expand the tree, right click them to expand everything.
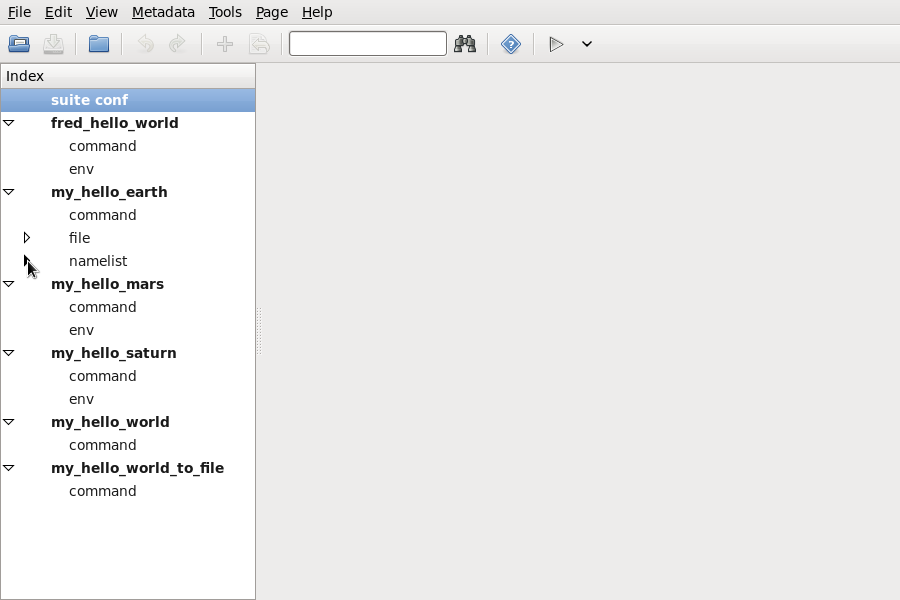
| The 'expander' triangles can expand the list of available pages. You can left or right click here. |
Left click on the page name to open it as a tab in the main (right hand) panel. Middle click to open a page as another tab (as in Firefox). You may right click on the tab label (at the top of the tab) to open a menu, and select Open in New Window to detach the tab to a separate window.
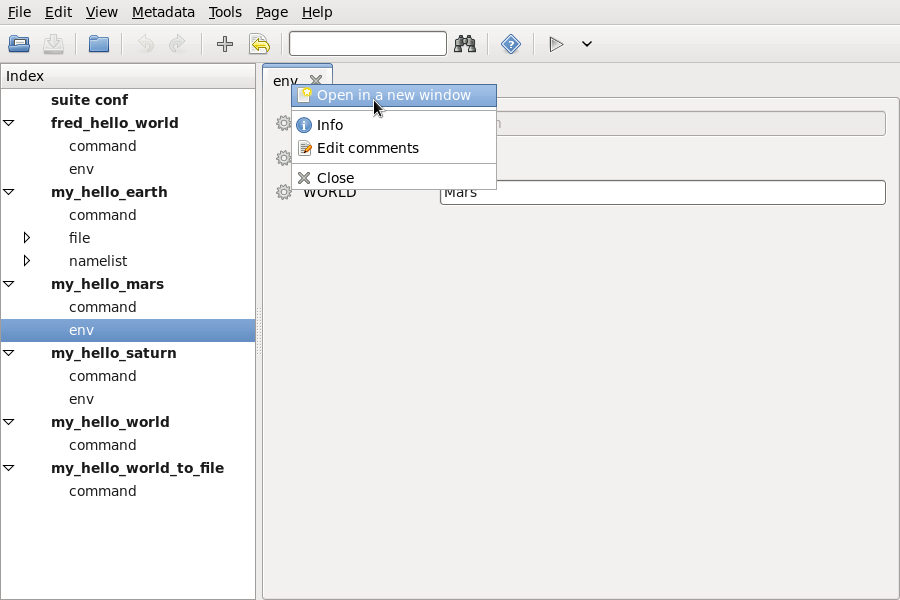
| You can launch a tab by clicking on a row in the left hand navigation list (left or middle click), or open a tab in a new window (right click on tab label). |
Alter a Setting
Hovering over the setting name or title, or clicking it, will give more information about the setting if it is available.
Use the right hand side widget, next to the setting name or title, to alter the value of the setting. This should flag the setting as modified (blue name or title text). It should also flag the page name with a blue icon in the left hand tree panel.
You can remove the setting or toggle the commenting-out of the setting using the menu button on the left hand side of the setting name or title. This menu will also hold help information if it is available.
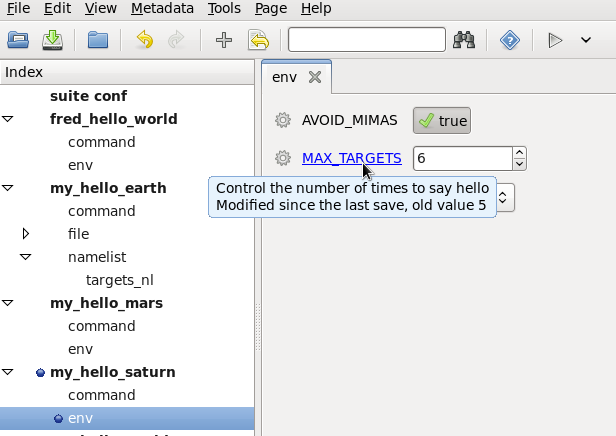
| The blue disc icon in the page list indicates changed values, as does the blue text at the mouse pointer. The hover-over text gives more information and includes a description of the change at the bottom. |
Adding Settings
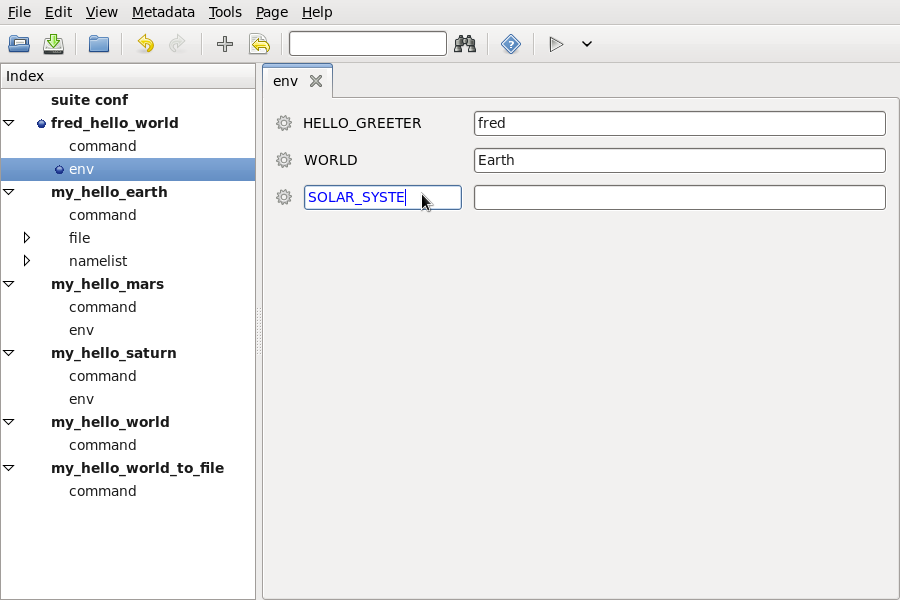
You can add a setting by selecting the Add button on the toolbar. You can then choose between adding a blank variable (a new setting with no metadata specification) or adding from a list of available settings for this page. If you choose a blank variable, you must then enter the name when the widget appears, using the entry box next to the menu button.
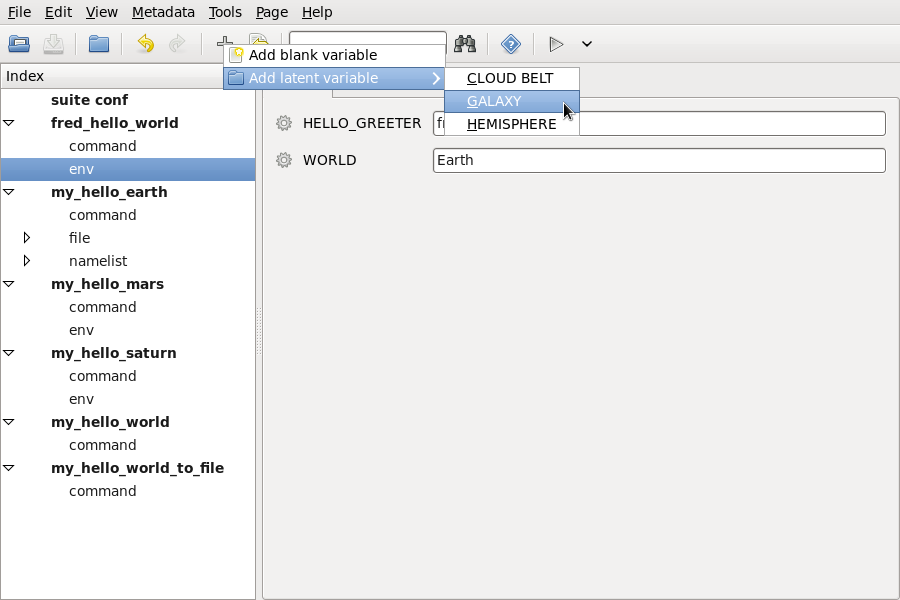
| The add menu, indicating which settings are available for this page. A setting with a custom name can also be added ("Add blank variable"). |
| Entering a name for a custom setting, after selecting "Add blank variable" from the above add menu. |
Alternately, you can view a list of available settings for the page by selecting View -> View Latent from the menu. You can then add them using their menu buttons (left hand widget next to the name or title).
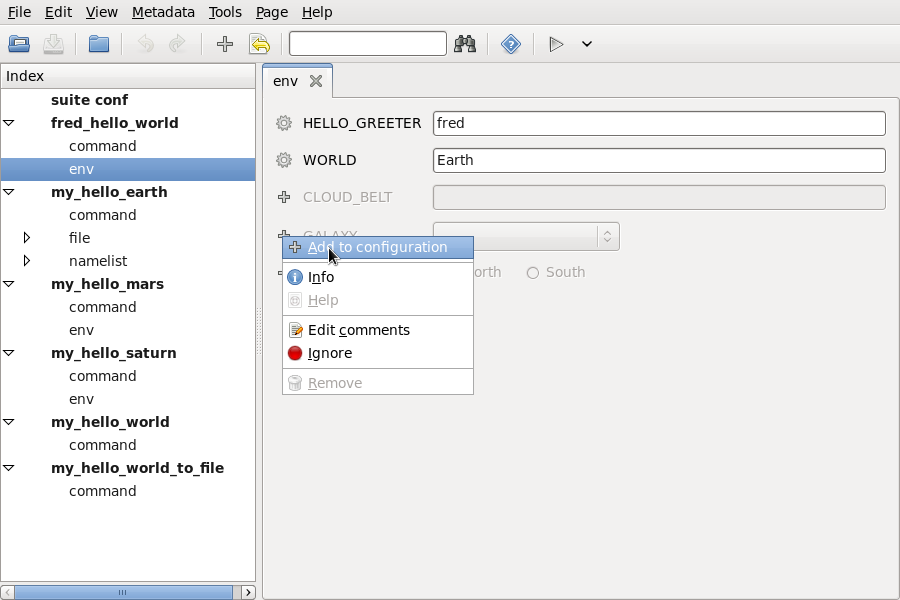
| Adding an available setting, using the View -> View Latent view option. |
Finding Settings
Settings can be found using the Find entry box in the toolbar, which searches for a title, name, or value that matches the regular expression you entered. For example, to search for a setting whose name startswith 'l' and ends with 'rad', enter
^l.*rad$
in the dialog box and press enter (or use the Find Next button).
To ignore case, pass the Python modifier
(?i) before the rest of the
expression:
(?i)^l.*rad$
Viewing Special Settings
Some settings are hidden by default - these can be shown using the View menu. View Fixed shows the settings that are only allowed to have one value according to the metadata.
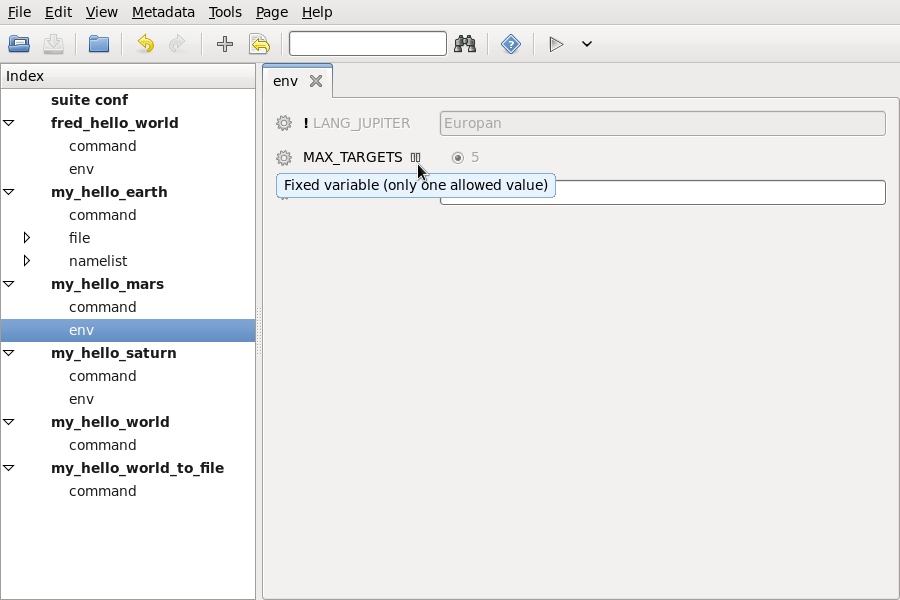
| The figure shows a 'fixed' variable. |
View Ignored shows the settings that are currently 'commented-out'.
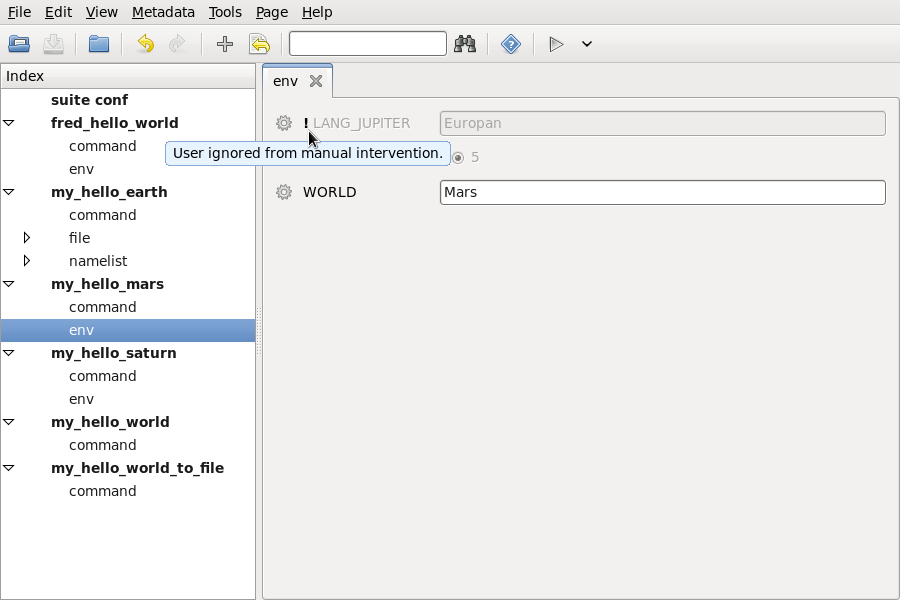
| The figure shows a 'user-ignored' variable. |
Switching off metadata
Sometimes it is necessary to switch off metadata. This can be done via the menu item Metadata > Switch off metadata. This allows you to view the data to be presented without the type widgets. For example, if you need to modify an integer setting to use an environment variable substitution syntax, you will not be able to do so using an integer widget (which will not even allow you to type a $ sign). In this case, you can switch off the metadata, type the new value in the raw input text box, then switch metadata back on again.
Adding a Section
Navigate to the part of the tree (left hand tree panel) where you wish to add a section and right click on one of the names. Choose Add section and type in the name in the dialog. You can then add settings to the section in the normal way.
Cloning a Section
Some sections are effectively duplicates of one another (e.g. numbered same-name namelists). To speed up copying these sections, you can right click on their page name in the left hand tree panel and select 'Clone section'.
Removing a Section or Set of Sections
Right click on the part of the tree (page name in the left hand tree panel) that you want to remove and click Remove. This will remove all the settings belonging to the page and any child pages from the tree and configuration.
Accessing Page Help
Page help can be accessed using either the left hand tree panel (right click on the page name) or the tab/page label (right click).
Undoing Changes
You can undo your changes by pressing Undo on the toolbar, or by clicking the Revert page to last save button on the toolbar. Similarly, you can redo them by pressing Redo.
Saving Changes
Use the File->Save or the Save button on the toolbar in the normal way. These options will be greyed out if there is no difference between the last saved state and the current one.
Rose Config Edit Layout
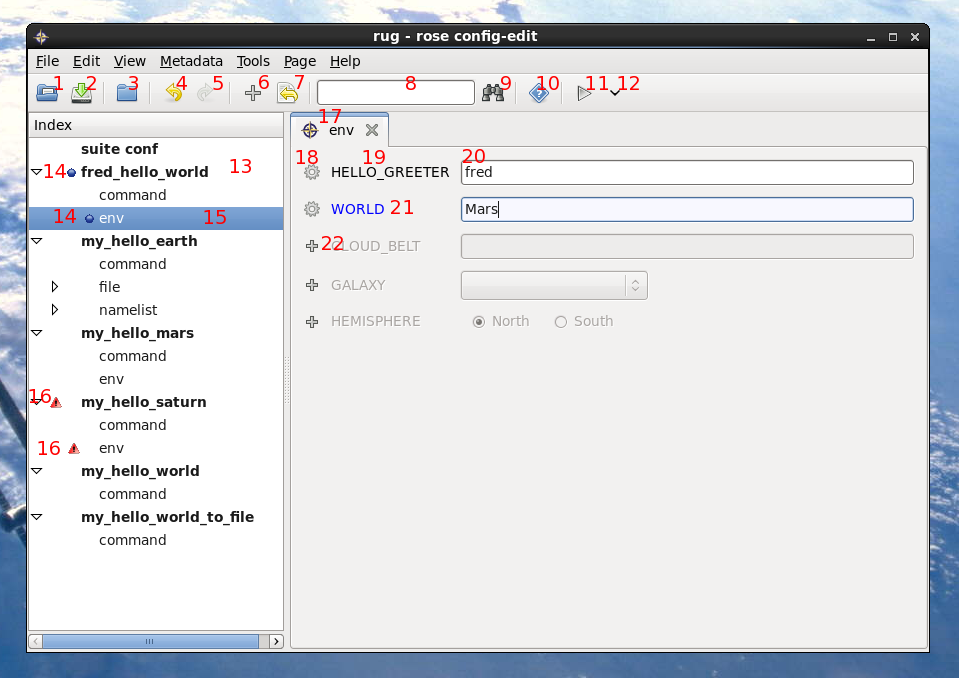
Layout:
|
Customising Rose Config-Edit
Customising Themes and Colours
The default style, font, and some colours of the config editor are controlled by the GNOME desktop theme. This can be altered by running:
gnome-appearance-properties
There are a few hard coded colours in the config editor that should be overridden if the theme is substantially different from the standard blue widget/grey background. These live in the config_editor/__init__.py file.
The default colours can be overridden by creating a user configuration file ~/.metomi/rose.conf in your home directory, if it doesn't already exist, and adding text such as this:
[rose-config-edit]
colour_valuewidget_base_selected=Lemon Chiffon
colour_variable_text_val_env=green
colour_variable_changed=Medium Orchid
These option names are lowercased translations of the constants in the config_editor/__init__.py file. Any of the colours specified there (constants that begin with "COLOUR") can be changed easily. The allowed colour strings are specified in the X11 rgb.txt file and are quite extensive.
Customising Views and Layouts
Changes are not restricted to colours - any constants in this python module can be overridden in your rose.conf file (but be careful with some of them!).
The view and layout defaults in the config editor can be overridden using the rose.conf file. Have a look at the constants in config_editor/__init__.py beginning with "SHOULD_SHOW".
These can be altered by adding to your site or user configuration as explained in Customising Themes and Colours - for example, to show latent pages and variables by default, include the following in your site or user configuration:
[rose-config-edit]
should_show_latent_pages=True
should_show_latent_vars=True
You can even set custom layout strings for the title, description, and help of settings - see the constants beginning with "SHOULD_SHOW_CUSTOM" and "CUSTOM_FORMAT". For example, to always include the description of a setting in the help string presented to the user, you could place the following text in your site or user configuration:
[rose-config-edit]
custom_format_help="{description}\n\n{help}"
should_show_custom_help=True
Customisable Options Reference
The following are potentially useful options that you may want to set in your site or user configuration under the [rose-config-edit] section.
colour_macro_changed="blue"
Configure the colour for 'changed' action.
colour_macro_error="red"
Configure the colour for an error.
colour_macro_warning="orange"
Configure the colour for a warning.
colour_stack_added="green"
Configure the colour for 'added' action.
colour_stack_changed="blue"
Configure the colour for 'changed' action.
colour_stack_changed_comments="dark blue"
Configure the colour for 'changed comments' action.
colour_stack_enabled="light green"
Configure the colour for 'light green' action.
colour_stack_ignored="grey"
Configure the colour for 'grey' action.
colour_stack_removed="red"
Configure the colour for 'red' action.
colour_valuewidget_base_selected="ghostwhite"
Configure the background colour for the currently-selected variable widget.
colour_variable_changed="blue"
Configure the modified-status variable widget colour.
colour_variable_text_error="dark red"
Configure the error-state variable widget colour.
colour_variable_text_irrelevant="light grey"
Configure the irrelevant-value variable widget colour.
colour_variable_text_val_env="purple4"
Configure the environment-variable-value variable widget colour.
custom_format_description="{name}: {description}"
Configure the override custom format used for description.
custom_format_help="{title}\n\n{help}"
Configure the override custom format used for help.
custom_format_title="{title} ({name})"
Configure the override custom format used for title.
should_show_all_comments=False
Control showing all comment text.
should_show_custom_description=False
Control showing a custom variable description format.
should_show_custom_help=False
Control showing a custom variable help format.
should_show_custom_title=False
control showing a custom variable title format.
should_show_fixed_vars=False
Control showing fixed variables on a page.
should_show_flag_no_meta_vars=False
Control flagging no-metadata variables.
should_show_flag_opt_conf_vars=True
Control flagging optional configuration variables.
should_show_flag_optional_vars=False
Control flagging non-compulsory variables.
should_show_ignored_pages=False
Control showing ! or !! ignored pages.
should_show_ignored_vars=False
Control showing ! or !! ignored variables on a page.
should_show_latent_pages=False
Control showing latent (potential) pages.
should_show_latent_vars=False
Control showing latent (potential) variables on a page.
should_show_no_description=False
control hiding the description text for variables on a page.
should_show_no_help=True
Control hiding the help text for variables on a page.
should_show_no_title=False
Control hiding the title text for variables on a page.
should_show_status_bar=True
Control showing the status bar.
should_show_user_ignored_pages=True
Control showing ! ignored pages.
should_show_user_ignored_vars=True
Control showing ! ignored variables on a page.
size_macro_dialog_max=(800, 600)
Configure the width and height of the macro dialog in pixels (as a tuple).
size_page_detach=(650, 600)
Configure the width and height of a detached tab in pixels (as a tuple).
size_stack=(800, 600)
Configure the width and height of the stack viewer in pixels (as a tuple).
size_window=(900, 600)
Configure the width and height of the config editor in pixels (as a tuple).
spacing_page=10
Configure the pixel padding/spacing between config editor major items.
spacing_sub_page=5
Configure the pixel padding/spacing between config editor minor items.
summary_data_panel_error_markup="<span color='red'>x</span>"
Configure the pango markup used to indicate an error.
summary_data_panel_modified_markup="<span color='blue'>*</span>"
Configure the pango markup used to indicate modified state.
title_page_latent_colour="grey"
Configure the colour used to indicate a latent page in the page tree.
tree_panel_max_expanded_depth=2
Configure the depth to which the page tree will expand itself.
tree_panel_max_expanded_roots=5
Configure the maximum number of configurations loaded at startup.
tree_panel_no_expand_leaves_regex="/file$"
Configure a regex for pages whose children should not be expanded.
width_tree_panel=256
Configure the width of the lhs page tree in pixels.