Using Subversion
One of the key strengths of Subversion is its documentation. Version Control with Subversion (which we'll just refer to as the Subversion book from now on) is an excellent book which explains in detail how to use Subversion and also provides a good introduction to all the basic concepts of version control. Rather than trying to write our own explanations (and not doing as good a job) we will simply refer you to the Subversion book, where appropriate, for the relevant information.
In general, the approach taken in this section is to make sure that you first understand how to perform a particular action using the Subversion tools and then describe how this differs using FCM.
Basic Concepts
In order to use FCM you need to have a basic understanding of version control. If you're not already familiar with Subversion or CVS then please read the chapter Fundamental Concepts from the Subversion book. In particular, make sure that you understand:
- The
Copy-Modify-Merge
approach to file sharing. - Global Revision Numbers.
Note that this chapter states that
working copies do not always correspond to any single revision in the
repository
. However, the FCM working practices do not encourage this and
the wrapper scripts provided by FCM should ensure that your working copy (a
local copy of the repository's files and directories where you can prepare
changes) always corresponds to exactly one revision.
CVS users should already be familiar with all the basic concepts. This is not surprising since Subversion was designed as a replacement for CVS and it uses the same development model. However, there are some important differences which may confuse those more familiar with CVS. Fortunately, the appendix in the Subversion book Subversion for CVS Users is specifically written for those moving from CVS to Subversion and you should read this if you are a CVS user.
Basic Command Line Usage
Before we discuss the FCM system you need to have a good understanding of how to perform most of the normal day-to-day tasks using Subversion. Therefore, unless you are already familiar with Subversion, please read the chapter Basic Usage from the Subversion book.
So, now you have an understanding of how to do basic tasks using
Subversion (you did read the Basic Usage chapter didn't you?),
how is using FCM different? Well, the key thing to remember is that, instead
of using the command svn you need to use the command
fcm. The advantages of this are as follows:
fcmimplements all of the commands thatsvndoes (including all the command abbreviations).- In some cases
fcmdoes very little and basically passes on the command tosvn. - In other cases
fcmhas a lot of additional functionality compared with the equivalentsvncommand. fcmalso implements several commands not provided bysvn.fcmprovides support for URL and revision keywords.- Most of the additional features and commands are discussed later in this section or in the following sections.
Full details of all the fcm commands available are provided
in the FCM Command Reference section.
URL And Revision Keywords
URL keywords can be used to specify URLs in fcm commands. The
syntax is fcm:<keyword>. Keywords can be defined in the
FCM keyword configuration file (i.e. $FCM/etc/fcm/keyword.cfg
and $HOME/.metomi/fcm/keyword.cfg).
For example, if you define a keyword in your configuration file as follows:
location{primary}[um] = svn://fcm2/UM_svn/UM
then you can abbreviate the URL as in the following examples:
# fcm ls svn://fcm2/UM_svn/UM
fcm ls fcm:um

# fcm ls svn://fcm2/UM_svn/UM/trunk
fcm ls fcm:um_tr  # OR: fcm ls fcm:um-tr

# fcm ls svn://fcm2/UM_svn/UM/branches
fcm ls fcm:um_br  # OR: fcm ls fcm:um-br

# fcm ls svn://fcm2/UM_svn/UM/tags
fcm ls fcm:um_tg  # OR: fcm ls fcm:um-tg
Using URL keywords has two advantages.
- They are shorter and easier to remember.
- If the repository needs to be moved then only the keyword definitions
need to be updated (although any working copies you have will still need to
be relocated by issuing a
fcm
    switch --relocate
command).
In a similar way, revision keywords can be used to specify revision
numbers in fcm commands. The keyword can be used anywhere a
revision number can be used. Each keyword is associated with a URL keyword
and can only be used when referring to that repository.
For example, if you define a keyword in your configuration file as follows:
revision[fcm:vn1.0] = 112
then the following commands are equivalent:
fcm log -r 112 svn://fcm1/FCM_svn/trunk
fcm log -r vn1.0 fcm:fcm_tr
You can use the fcm keyword-print command to print all
registered location keywords. You can also print the location keyword and the
revision keywords of a particular project. For example, to print the keywords
for the UM project, you can type fcm keyword-print
fcm:um.
Examining Changes
Code differences can be displayed graphically using xxdiff by
using the --graphical (or -g) option to fcm
diff. This option can be used in combination with any other options
which are accepted by svn diff.
An example display from xxdiff is shown below.

xxdiff 2-way display
Points to note:
- By default
xxdiffis configured to show horizontal differences. This means that the parts of the line which have changed are highlighted (e.g. the text useful is highlighted in the example above). - The number shown to the right of each file name shows the current line number. The number on the far right is the number of differences found (2 in the example above).
- You may find the following keyboard shortcuts useful.
- N - move to the next difference
- P - move to the previous difference
- Ctrl-Q - exit
- If you want to use another diff tool instead of
xxdiffto examine changes, you can define thegraphic-diffsetting in a FCM external configuration file (i.e.$FCM/etc/fcm/external.cfg or $HOME/.metomi/fcm/external.cfg). For example, to usetkdiff, you can do:# in your site's $FCM/etc/fcm/external.cfg: # OR: in your $HOME/.metomi/fcm/external.cfg: graphic-diff = tkdiff
Resolving Conflicts
Your working copy may contain files or directories in conflict as a result of an update or a merge (covered later). Conflicts arise from the situation where two changes being applied to a file overlap. These can be text-based, as in two changes to the same line of text in a file, or filesystem-based, as in two different renamings of the same file.
For conflicts in normal (text) files, the command fcm
conflicts can be used to help resolve them. (A discussion on binary
files is given in the section Working
with Binary Files later in this document.). For each file in text
conflict, the fcm conflicts command calls a graphical merge
tool (i.e. xxdiff by default) to display a 3-way diff.
An example display from xxdiff is shown below.
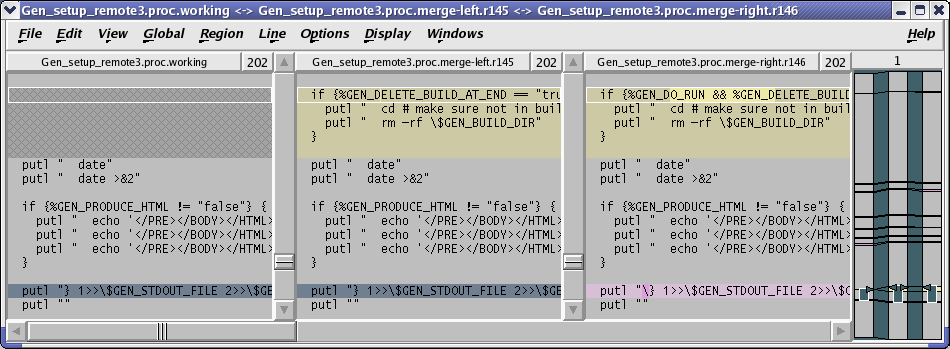
xxdiff 3-way display
Points to note:
- The file in the middle is the common ancestor from the merge. The file on the left is your original file and the file on the right is the file containing the changes which you are merging in.
xxdiffis configured to automatically select regions that would end up being selected by an automatic merge (e.g. there are only changes in one of the files). Any difference hunks which cannot be resolved automatically are left unselected.- Before you can save a merged version you need to go through each
unselected difference hunk and decide which text you wish to use.
- Selecting a diff hunk can be carried out by clicking on it with the left mouse button (or refer to the keyboard shortcuts shown under the Region menu). The colours update to display which side is selected for output. You can select individual lines with the middle mouse button.
- If you want to select more than one side, you have to invoke the Region->Split/swap/join command (keyboard shortcut: S). This will split the current diff hunk so you can select the pieces you want from both sides. Further invocations of this command will cause swapping of the regions, looping through all the different ordering possibilities, and finally joining the regions again (preserving selections where it is possible).
- The number on the far right is the number of unselected difference hunks (1 in the example above). Once this number is 0 then you are ready to save the merged file.
- If you want to see how the merged file will look with the current selections then select Windows->Toggle Merged View (keyboard shortcut: Alt+Y). An extra window then appears showing the merged output that updates interactively as you make selections.
- You may find the following keyboard shortcuts useful.
- B - move to the next unselected hunk
- O - move to the previous unselected hunk
- There are several different ways to exit the 3-way diff (available from
the File menu):
- Exit with MERGE (keyboard shortcut: M) - This saves the merge result. If there are any unselected difference hunks remaining then you will be warned and given the option of saving the file with conflict markers.
- Exit with ACCEPT (keyboard shortcut: A) - This saves the file you are merging in (i.e. the right one) as the merge result (i.e. you have accepted all the changes).
- Exit with REJECT (keyboard shortcut: R) - This saves the original working copy file (i.e. the left one) as the merge result (i.e. you have rejected all the changes).
If you just want to exit without making any decisions you can also just close the window.
- For further details please read the
xxdiffusers manual (available from the Help menu). In particular, read the section Merging files and resolving conflicts.
If you have resolved all the conflicts in a file then you will be prompted
on whether to run svn resolved on the file to signal that the
file is no longer in conflict.
(SHELL PROMPT)$ fcm conflicts
Conflicts in file: Gen_setup_local1.proc
You have chosen to ACCEPT all the changes
Would you like to run "svn resolved"?
Enter "y" or "n" (or just press <return> for "n"): y
Resolved conflicted state of 'Gen_setup_local1.proc'
Conflicts in file: Gen_setup_remote2.proc
Merge conflicts were not all resolved
Conflicts in file: Gen_setup_remote3.proc
All merge conflicts resolved
Would you like to run "svn resolved"?
Enter "y" or "n" (or just press <return> for "n"): y
Resolved conflicted state of 'Gen_setup_remote3.proc'
It is important to realise that there are some types of merge that
xxdiff will not be able to help you with.
- It you have 2 versions of a file, both with substantial changes to the
same piece of code, then the
xxdiffdisplay will be extremely colourful and not very helpful. - In these cases it is often easier to start with one version of the file and manually re-apply the changes from the other version. It might not be obvious how to do this and you may need to speak to the author of the other change to agree how this can be done. Fortunately this situation should be very rare.
- For a more detailed discussion please refer to Chapter 3: File Merge in the online book called Source Control HOWTO.
For files in tree conflict, which is otherwise known as a
structural or filesystem-based conflict, the command fcm
conflicts will manually resolve the problem by prompting you to choose
a course of action. You can either keep the file as it was before the merge
(keep local), or accept the external changes to the file.
The most common way to generate a tree conflict after a merge is when a file has been deleted or renamed on one branch, and modified on another. These are incompatible changes, to Subversion, and it doesn't know which action to take. This is the cause of the tree conflict dilemma which the user must solve.
In the following example, the branch in the working copy has had a deletion of a file. The branch that is being merged in has subsequently modified the file, which means that you may want to incorporate these changes. A tree conflict is therefore flagged up.
(SHELL PROMPT)$ fcm merge fcm:tutorial_br/dev/bfitz/r1_366
Merge(s) available from /tutorial/branches/dev/bfitz/r1_366: 1257
About to merge in changes from /tutorial/branches/dev/bfitz/r1_366@1257 compared with /tutorial/trunk@1
This merge will result in the following change:
--------------------------------------------------------------------------------
--- Merging r2 through r1257 into '.':
   C src/subroutine/hello_sub.f90
Summary of conflicts:
  Tree conflicts: 1
--------------------------------------------------------------------------------
Would you like to go ahead with the merge?
Enter "y" or "n" (or just press <return> for "n"): y
Performing merge ...
--- Merging r2 through r1257 into '.':
   C src/subroutine/hello_sub.f90
Summary of conflicts:
  Tree conflicts: 1
(SHELL PROMPT)$ fcm status
 M      .
!     C src/subroutine/hello_sub.f90
      >   local missing, incoming edit upon merge
(SHELL PROMPT)$ fcm info src/subroutine/hello_sub.f90
Path: src/subroutine/hello_sub.f90
Name: hello_sub.f90
Node Kind: none
Tree conflict: local missing, incoming edit upon merge
  Source  left: (file) svn://fcm1/tutorial_svn/tutorial/trunk/src/subroutine/hello_sub.f90@1
  Source right: (file) svn://fcm1/tutorial_svn/tutorial/branches/dev/bfitz/r1_366/src/subroutine/hello_sub.f90@1257
In this example, running fcm conflicts would give:
(SHELL PROMPT)$ fcm conflicts
[info] src/subroutine/hello_sub.f90: in tree conflict.
Locally: deleted
Externally: modified.
Answer (y) to leave the file deleted.
Answer (n) to add the file with the changes.
Keep the local version?
Enter "y" or "n" (or just press <return> for "n")
In this example, to keep the file as it was before (in a deleted state), enter y.
Otherwise, to accept the merge branch version of the file (adding it with the edited changes), enter n.
There are many other types of tree conflicts that can occur, and fcm
conflicts does not cover all of them. Tree conflicts arising from
updates and switches are not covered (which should be rare under FCM working
practice). More importantly, tree conflicts on directories are not covered,
because of the potential nesting of conflicts within the directories. It can
often be difficult to identify the problem and figure out the solution in the
case of directory conflicts, and the easiest solution may be to try to
resolve the discrepancy before the merge.
For further details, see the Tree Conflict annex
Adding and Removing Files
If your working copy contains files which are not under version control
then you can use the command fcm add --check to add them. This
will go through each of the files and prompt to see if you wish to put that
file under version control using svn add. For each file you can
enter y for yes, n for no or a to assume yes
for all following files.
(SHELL PROMPT)$ fcm add -c
?      xxdiff1.png
?      xxdiff2.png
?      xxdiff3.png
?      xxdiff4.png
Add file 'xxdiff1.png'?
Enter "y", "n" or "a" (or just press <return> for "n"): y
A         xxdiff1.png
Add file 'xxdiff2.png'?
Enter "y", "n" or "a" (or just press <return> for "n"): n
Add file 'xxdiff3.png'?
Enter "y", "n" or "a" (or just press <return> for "n"): a
A         xxdiff3.png
A         xxdiff4.png
Similarly, if your working copy contains files which are missing (i.e. you
have deleted them without using svn delete) then you can use the
command fcm delete --check to delete them. This will go through
each of the files and prompt to see if you wish to remove that file from
version control using svn delete.
As noted in the Subversion FAQ, it can be dangerous using these commands. If you have moved or copied a file then simply adding them would cause the history to be lost. Therefore take care to only use these commands on files which really are new or deleted.
Committing Changes
The command fcm commit should be used for committing changes
back to the repository. It differs from the svn commit command
in a number of important ways:
- Your working copy must be up to date.
fcm commitwill abort if it finds that any files are out of date with respect to the repository. This ensures that your working copy reflects how the repository will be after you have committed your changes.- This helps to ensure that any tests you have done prior to committing are valid.
fcm commitis not suitable if you need to commit changes from a working copy containing mixed revisions. However, you are very unlikely to need to do this.- Actually there is a small chance that your working copy might not be up to date when you commit if someone else is committing some changes at the same time. However, this should very seldom happen and, even if it does, the commit would fail if any of the files being changed became out of date (i.e. it is not possible to lose any changes).
- If it discovers a file named #commit_message# in the top
level of your working copy it uses this to provide a template commit
message (which you can then edit).
- If you have performed a merge then a message describing the merge
will have been added to this file. It is important that you leave this
included in the commit message and do not change its format, as it is
used by the
fcm branch-infocommand. - You can, if you wish, add entries to this file as you go along to
record what changes you have prepared in your working copy. You can
also use the command
fcm commit --dry-runto allow you to edit the commit message without committing any changes. - #commit_message# is ignored by Subversion (so you
won't see it show up as an unversioned files when you run
fcm
        status
).
- If you have performed a merge then a message describing the merge
will have been added to this file. It is important that you leave this
included in the commit message and do not change its format, as it is
used by the
- It always operates from the top of your working copy. If you issue the
fcm commitcommand from a sub-directory of your working copy then it will automatically work out the top directory and work from there.- This ensures that any template commit message gets picked up and that you do not, for example, accidently commit a partial set of changes from a merge.
- It always commits all the changes in your working copy (it
does not accept a list of files to commit).
- Once again, this avoids any danger of accidently committing a partial set of changes.
- You should only work on one change within a working copy. If you need to prepare another, unrelated change then use a separate working copy.
- It runs
svn updateafter the commit to ensure that your working copy is at the latest revision and to avoid any confusion caused by your working copy containing mixed revisions.
(SHELL PROMPT)$ fcm commit
Starting editor to create commit message ...
Change summary:
------------------------------------------------------------------------
[Project: GEN]
[Branch : branches/test/frsn/r123_foo_bar]
[Sub-dir: <top>]

M      src/code/GenMod_Control/GenMod_Control.f90
M      src/code/GenMod_Control/Gen_SetupControl.f90
------------------------------------------------------------------------
Commit message is as follows:
------------------------------------------------------------------------
An example commit.
------------------------------------------------------------------------
Would you like to commit this change?
Enter "y" or "n" (or just press <return> for "n"): y
Sending        src/code/GenMod_Control/GenMod_Control.f90
Sending        src/code/GenMod_Control/Gen_SetupControl.f90
Transmitting file data ..
Committed revision 170.
=> svn update
At revision 170.
Branching And Merging
Branching is a fundamental concept common to most version control systems. For a good introduction please read the chapter Branching and Merging from the Subversion book. Even if you are already familiar with branching using other version control systems you should still read this chapter to see how branching is implemented in Subversion.
Having read this chapter from the Subversion book you should understand:
- Why each project directory has sub-directories called trunk,
branches and tags. This structure is assumed by
fcm(Subversion recommends it but doesn't insist on it). - That when you make a branch you are taking a copy of the entire project
file tree. Fortunately, the design of the Subversion repository means that
these copies are
cheap
- they are quick to create and take very little space. - That Subversion has only implemented merge tracking recently, long after FCM has implemented its own solution optimised for our recommended working practice.
- That each revision of your repository can also be thought of as a changeset.
- That once a change is committed to a repository it cannot be removed (only reversed). Therefore you must take care not to committ a sensitive document or a large data file unintentionally.
FCM provides various commands which make working with branches easier (as described in the following sections).
Creating Branches
The command fcm branch-create (or simply fcm
bcreate or even fcm bc) should be used for creating new
branches. It provides a number of features:
- It applies a standard naming convention for branches. The branch name is automatically constructed for you depending on the option(s) supplied to the command. The full detail of these options are described in the FCM Command Reference > fcm branch-create section.
- By default, it assumes that you are branching from the last changed
revision of the trunk.
- You can use the
--branch-of-branchoption if you need to create a branch of a branch. A branch of a branch can be useful in many situations. For example, consider a shared branch used by several members of your team to develop, say, a new science scheme, and you have come up with some different ideas of implementing the scheme. You may want to create a branch of the shared branch to develop your idea before merging it back to the shared branch. Note that you can only merge a branch of a branch with it's parent or with another branch created from the same parent. You can't, for example, merge it with the trunk. - You can do
fcm bc NAME SOURCE@REVif you need to create a branch from an earlier revision of the SOURCE.
- You can use the
- Each branch always contains a full copy of the trunk (or its parent
branch) - you cannot create a branch from a sub-tree.
- There would be no reason to only include a sub-tree in a branch.
- It applies a standard commit message which defines how the branch has
been created. If a Trac ticket is specified using the
--ticket
    <number>
option, it is added to the commit log message. If you need to add anything to the commit log message, please do so above the line that says --Add your commit message ABOVE - do not alter this line or those below--.
The following is a list of the different types of branches available:
- User development branches
- branches/dev/<Userid>/<Branch_Name> These are for changes which are intended to be merged back to the trunk once they are complete. Most branches will belong to this type. e.g. branches/dev/frdm/vn6.1_ImprovedDeepConvection, branches/dev/frdm/r2134_NewBranchNamingConvention.
- Shared development branches
- branches/dev/Share/<Branch_Name>
- User test branches
- branches/test/<Userid>/<Branch_Name> These are for changes which are not intended for the trunk. e.g. Proof of concept work, temporary code written for dealing with a one-off problem, etc.
- Shared test branches
- branches/test/Share/<Branch_Name>
- User packages
- branches/pkg/<Userid>/<Branch_Name> These are branches which combine together a number of different development branches. Sometimes this will simply be for testing purposes (i.e. for testing a branch in combination with other branches). Other times it may be the package which eventually gets merged to the trunk (rather than the development branches). e.g. branches/pkg/frdm/vn6.1_TestImprovedDeepConvection
- Shared packages
- branches/pkg/Share/<Branch_Name> E.g. branches/pkg/Share/vn6.1_NewConvectionScheme.
- Configurations
- branches/pkg/Config/<Branch_Name> These are major packages which combine together a number of different packages and development branches. e.g. branches/pkg/Config/vn6.1_HadGEM1a.
- Releases
- branches/pkg/Rel/<Branch_Name> These may be bug-fix branches for system releases, if required. They can also be branches on which stable releases are prepared if you don't do this on the trunk (although you lose the ability to branch from stable releases if you work this way). e.g. branches/pkg/Rel/vn6.1_BugFixes.
(SHELL PROMPT)$ fcm bcreate -k 23 my_test_branch fcm:test
Starting nedit to create commit message ...
Change summary:
------------------------------------------------------------------------
A    svn://fcm1/repos/OPS/branches/dev/frsn/r118_my_test_branch
------------------------------------------------------------------------
Commit message is as follows:
------------------------------------------------------------------------
Create an example branch to demonstrate branch creation for the user guide.
#23: Created /OPS/branches/dev/frsn/r118_my_test_branch from /OPS/trunk@118.
------------------------------------------------------------------------
Would you like to go ahead and create this branch?
Enter "y" or "n" (or just press <return> for "n"): y
Creating branch svn://fcm1/repos/OPS/branches/dev/frsn/r118_my_test_branch ...

Committed revision 169.
Listing Branches Created by You or Other Users
The command fcm branch-list (or simply fcm bls)
can be used to list the branches you have created at the HEAD of a
repository. If you specify the --user <userid> option, the
branches created by <userid> are listed instead. You can specify
multiple users with multiple --user <userid> options, or
with a colon (:) separated list to a single --user
<userid:list> option. Note that you can also list shared
branches by specifying <userid> as Share, configuration
branches by specifying <userid> as Config and release
branches by specifying <userid> as Rel. The command
returns 0 (success) if one or more branches is found for the specified users,
or 1 (failure) if no branch is found.
(SHELL PROMPT)$ fcm branch-list fcm:gen
1 branch found for frsn in svn://fcm1/GEN_svn/GEN
fcm:GEN-br/dev/frsn/r1191_clean_up/
(SHELL PROMPT)$ echo $?
0
(SHELL PROMPT)$ fcm branch-list --user frbj --user frsn fcm:gen
2 branches found for frbj, frsn in svn://fcm1/GEN_svn/GEN
fcm:GEN-br/dev/frbj/r1177_gen_ui_for_scs/
fcm:GEN-br/dev/frsn/r1191_clean_up/
(SHELL PROMPT)$ echo $?
0
(SHELL PROMPT)$ fcm branch-list --user frva fcm:gen
0 branch found for frva in svn://fcm1/GEN_svn/GEN
(SHELL PROMPT)$ echo $?
1
Getting Information About Branches
The command fcm branch-info (or simply fcm
binfo) can be used to get various information about a branch. In
particular, it summarises information about merges to and from the branch and
its parent.
(SHELL PROMPT)$ fcm branch-info
URL: svn://fcm1/FCM_svn/FCM/branches/dev/frsn/r1346_merge
Repository Root: svn://fcm1/FCM_svn
Revision: 1385
Last Changed Author: frsn
Last Changed Rev: 1385
Last Changed Date: 2006-04-20 11:08:45 +0100 (Thu, 20 Apr 2006)
--------------------------------------------------------------------------------
Branch Create Author: frsn
Branch Create Rev: 1354
Branch Create Date: 2006-04-04 14:27:47 +0100 (Tue, 04 Apr 2006)
Branch Parent: svn://fcm1/FCM_svn/FCM/trunk@1346
Last Merge From Parent, Revision: 1444
Last Merge From Parent, Delta: /FCM/trunk@1439 cf. /FCM/trunk@1395
Merges Avail From Parent: 1445
Merges Avail Into Parent: 1453 1452 1449 1446 1444 1443 1441 1434 1397 1396 ...
If you need information on the current children of the branch, use the
--show-children option of the fcm branch-info
command. If you need information on recent merges to and from the branch and
its siblings, use the --show-siblings option of the fcm
branch-info command.
To find out what changes have been made on a branch relative to its parent
you can use the command fcm branch-diff (or simply fcm
bdi.
- You can combine this with the options:
--graphical- to display the differences using a graphical diff tool
--trac- to display the differences using Trac
--wiki- to print a wiki syntax suitable for inserting into Trac
- The base of the difference is adjusted to account for any merges from the branch to its parent or vice-versa.
Switching your working copy to point to another branch
The command fcm switch can be used to switch your working
copy to point to another branch. For example, if you have a working copy at
$HOME/work, currently pointing to the trunk or a branch of a
project at svn://fcm1/FCM_svn/FCM/trunk, you can switch the
working copy to point to another branch of same project:
(Shell prompt)$ cd $HOME/work
(Shell prompt)$ fcm sw dev/frsn/r959_blockdata
-> svn switch --revision HEAD svn://fcm1/FCM_svn/FCM/branches/dev/frsn/r959_blockdata
U    doc/user_guide/getting_started.html
U    doc/user_guide/code_management.html
U    doc/user_guide/command_ref.html
U    src/lib/FCM1/SrcFile.pm
U    src/lib/FCM1/Util.pm
U    src/lib/FCM1/Build.pm
U    src/lib/FCM1/Cm.pm
U    src/lib/FCM1/SrcPackage.pm
U    src/bin/fcm_internal
U    src/bin/fcm_gui
Updated to revision 1009.
Unlike svn switch, fcm switch does extra
checking to ensure that your whole working copy is switched to the new branch
at the correct level of sub-directory. In addition, you can specify only the
branch part of the URL, such as trunk,
branches/dev/fred/r1234_bob or even
dev/fred/r1234_bob and the command will work out the full URL
for you.
Deleting Branches
The command fcm branch-delete (or simply fcm
bdel) can be used to delete branches which are no longer required.
Before being asked to confirm that you want to delete the branch, you will
first see the same output as from fcm branch-info. This allows
you to check, for example, whether your branch is being used anywhere else or
whether the latest changes on your branch have been merged to the trunk. You
will be prompted to edit your commit log message. If you need to add anything
to the commit log message, please do so above the line that
says --Add your commit message ABOVE - do not alter this line or those
below--.
Merging
As mentioned earlier, fcm has its own merge tracking solution
which is optimised for our recommended working practice. The solution assumes
the following:
- That all merges are performed using FCM and are identified using a standard template in the commit log message.
- That you only ever merge all the changes available on the source branch up to a chosen point (i.e. you can't only include a subset of the changes made to the branch).
- That the source and target are both branches (or the trunk) in the same FCM project.
- That the source and target are directly related, i.e. they must either have a parent/child relationship or they are siblings from the same parent branch.
Note that the term source branch and target branch referred to above can also mean the trunk.
To perform a merge, use the command fcm merge <source>.
This includes a number of important features:
- If it finds any local modifications in your working copy then it checks whether you wish to continue (in most cases you won't want to mix a merge with other changes).
- It determines the base revision and path of the common ancestor to be used for the merge, taking into account any merges from the source to the target or vice-versa.
- Before doing the merge, (unless you specify the
--non-interactiveoption), it reports what changes will result from performing the merge and checks that you wish to continue. - It adds details of the merge, using a standard template, into the
commit message file (#commit_message#). If you need to add any
extra comment, you should do so above the line that says
--Add your commit message ABOVE - do not alter this line or those
below--.
- If you decide to revert the merge, you should remove the template line manually from the commit message file, making sure that you do not alter the standard template by accident.
- If the
--auto-logoption is specified, it adds the log messages of the merged revisions as well as the standard template. This is particularly useful when a small change is prepared in a branch, and often the same commit log messages have to be repeated when the change is merged and committed to the trunk. The option does not work very well if the branch contains merges from another branch.
(SHELL PROMPT)$ fcm merge trunk # merge changes from the trunk into the branch
Eligible merge(s) from FCM/trunk: 1383 1375
Enter a revision (or just press <return> for "1383"):
Merge: /FCM/trunk@1383
 c.f.: /FCM/trunk@1371
-------------------------------------------------------------------------dry-run
A    doc/fortran_standards/index.html
U    src/lib/FCM1/ReposBranch.pm
-------------------------------------------------------------------------dry-run
Would you like to go ahead with the merge?
Enter "y" or "n" (or just press <return> for "n"): y
Merge succeeded.
Using the GUI
So far, all the tools described have been command line tools. Many people will be happy with these but, for those who prefer it, there is also a simple Graphical User Interface (GUI).
Starting the GUI
To run the GUI simply issue the command fcm gui from the
directory you want as your working directory.
The GUI consists of several sections:
- The top section contains a row of buttons to allow you to select which command you want to run.
- Beneath this is shown the current working directory and the top level directory of your working copy (these may be the same).
- Beneath this come various buttons and entry boxes to allow you to configure the command you have selected. These vary according to the command.
- Beneath this comes a further row of buttons
- Quit - this exits the GUI.
- Help - this displays the help message for the selected command.
- Clear - this empties the text window.
- Run - this allows you to run your command.
- Beneath this comes a scrolling text window where the output from the commands is displayed.
- The bottom section displays help information when you position the cursor over various parts of the GUI.
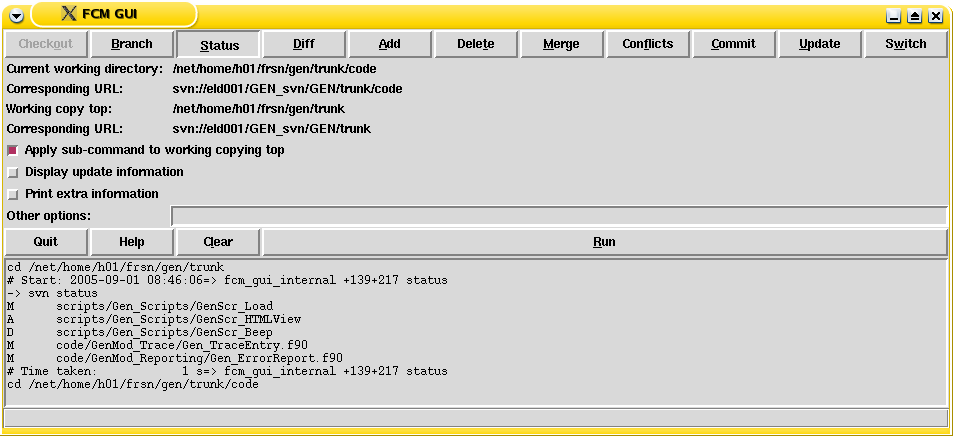
Example GUI screen with the Status commands selected
If you run a more complicated command, like fcm
branch-create, which prompts for input then extra entry windows will
pop up.
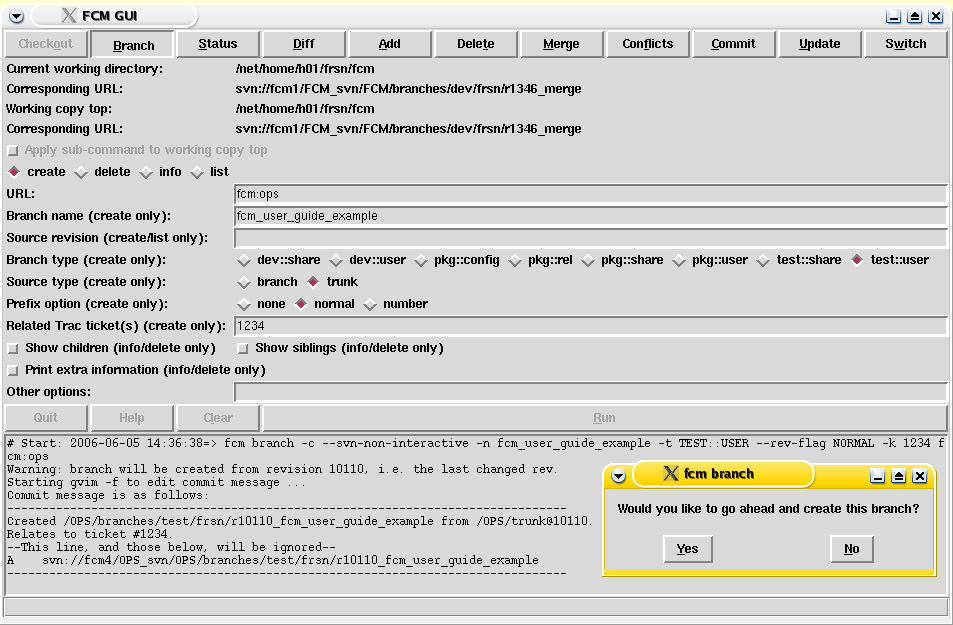
Example GUI pop-up window
GUI Commands
The commands available from the GUI should be self explanatory. A few points to note:
- If the current directory is not a working copy, you will only be able to Checkout a working copy or create a branch from the GUI.
- The Checkout command is only available if you start the GUI in a directory which is not already a working copy. After successfully running a checkout the GUI automatically sets the working directory to the top of this new working copy.
- With some commands (Status, Diff, Add, Delete, Conflicts) you can choose whether to run from the top level of your working copy or from your working directory. With the remaining commands this would not make sense and they can only be run from the top level.
- You can only issue commands from the GUI if they do not need to prompt
you for authentication (i.e. the Subversion command can be run with the
--non-interactiveoption).- If authentication is required then the command issued by the GUI
will fail. For the
branch-create,branch-deleteandcommitcommands, which support the--passwordoption, you should specify your password in Other options and click Run again. For other commands, you should run the command in interactive mode on the command line. Use the command displayed in the GUI text window but remove the--non-interactiveoption. - Most repositories will be configured so that you only need authentication for writing (not reading). Therefore, the first command requiring authentication will probably be creating a branch or commiting to the trunk.
- You should only need to do this the first time you ever issue such a command on a each repository (unless the repository is moved to a new location) since the Subversion client caches this information for future comamnds .
- If authentication is required then the command issued by the GUI
will fail. For the
Known Problems with Subversion
There is a limitation with Subversion which you should be aware of. The
svn rename command is not a true rename/move operation, but is
implemented as a copy and delete. As a result, if you rename an item in a
branch, and later attempt to merge it back to the trunk, the operation may
not be handled correctly by svn merge (see subversion issue
898 for further details). Until such time as support for a true rename
is
implemented in Subversion, you should avoid renaming of files or directories
unless you can ensure that no-one is working in parallel on the affected
areas of the project.
Using Trac
Trac has a simple and intuitive web interface which is relatively easy to pick up. It also includes a User and Administration Guide which is full of helpful information (and is referred to extensively in this section).
Trac contains a menu bar at the top of each page (which we will refer to as the Trac menu). This provides access to all the main features.
Logging In
Although different projects may choose their own rules, we expect that most systems will have Trac configured so that all the information is viewable by anyone. However, in order to make any changes you will need to login. This ensures that any changes are identified with the appropriate userid.
In the rest of this section it is assumed that you have logged in to Trac and are therefore able to make changes.
If you haven't yet got a Trac userid (which should be the same as the userid you use for committing changes to Subversion) then please contact your system manager.
Using the Wiki Pages
A wiki enables documents to be written in a simple markup language using a web browser. See the Trac Guide for information on the Trac Wiki Engine. Make sure that you read the information provided on:
- Wiki Formatting which explains how to format your wiki pages.
- Wiki Page Names which explains how CamelCase is used to create New Wiki Pages.
- Trac Links which allow hyperlinking between Trac entities (tickets, reports, changesets, Wiki pages, milestones and source files). This is a fundamental feature of Trac which makes it easy, for example, to link a bug report (ticket) to the changeset which fixed the bug (and vice-versa).
Whenever you are viewing a wiki page in Trac you should see several buttons at the bottom of the page:
- Edit This Page - Clicking this will bring up a page where you can edit the page contents. Before saving your changes you can preview how the modified page will appear. You can also leave a comment explaining what changes you made.
- Attach File - Allows you to attach files to a page, e.g. an image.
- If you have admin rights then you will also see
- Delete This Version - Delete the particular version of the page you are viewing.
- Delete Page - Delete the page and all its history.
At the top of each wiki page at the right hand side you can select Page History. This shows you the full history of each page with details of when each change was made, who made the change and what the changes were.
Using the Repository Browser
The Trac Browser is used to view the contents of your repository. To get to it just select Browse Source from the Trac menu. You can view directories and files at any version, see their revision histories and view changesets. Any wiki formatting in log messages is recognised and interpreted so you can easily link a changeset to a Trac ticket by using Trac Links.
Using the Issue Tracker
The Trac issue database provides a way of tracking issues within a project (e.g. bug reports, feature requests, software support issues, project tasks). Within Trac an issue is often referred to as a Ticket.
Please refer to the Trac Guide for the following information:
-
The Trac Ticket
System - Creating and modifying tickets.
- Only Trac accounts with admin rights can modify ticket descriptions.
- Trac Ticket Queries - List tickets matching your chosen criterion.
Using the Roadmap
Each ticket can be assigned to a milestone. The Trac Roadmap can then be used to provide a view on the ticket system. This can useful to see what changes went into a particular system release or what changes are outstanding before a milestone can be reached.
Please refer to the Trac Guide for further information on the Trac Roadmap.
- Only Trac accounts with admin rights can add, modify and remove milestones using the web interface.
Using the Timeline
The Trac Timeline allows you to list all the activity on a project over any given period. It can list:
- Creation and changes to wiki pages.
- Creation, closure and changes to tickets.
- Commits to the Subversion repository.
- Milestones reached.